

As a coach, I see the same pattern with new clients: they have ambitious goals to lift heavy and transform their physique, but they’re held back by a body that’s been locked into a chair for years. Their hips are cemented, their upper back is rigid, and their fundamental movement quality is compromised. This isn't a strength problem—it's a mobility problem. Real progress isn’t just about adding more weight to the bar; it’s about earning the right to do so by moving well first.
Before you can build serious strength or achieve a lean physique, you have to restore basic human movement patterns. In practice, our clients who commit to just 10 minutes of targeted mobility work before their training sessions see faster strength gains, fewer nagging injuries, and better overall results. This isn't about becoming a contortionist or spending an hour on a foam roller. It's about performing specific drills that unlock your body's potential for high performance.
Think of mobility as the concrete foundation of a skyscraper. Without it, you’re trying to build a structure on sand. A dedicated mobility routine is a non-negotiable component of a serious training plan. To truly unlock your strength and optimize your fitness journey, understanding the importance of proper preparation is key. You can learn more about how to warm up before exercise to maximize your performance and prevent injury.
This article cuts through the noise and provides the exact mobility exercises for beginners that we program for our clients. These are the seven essential movements we use to help busy professionals build a resilient, high-performing body, setting the stage for sustainable, long-term results.
1. Cat-Cow Stretch (Spinal Mobility)
The Cat-Cow is a foundational movement we use with nearly every client, from brand-new beginners to advanced lifters. It’s not just a simple stretch; it's an assessment and a corrective exercise rolled into one. It’s one of the most effective mobility exercises for beginners for reintroducing controlled flexion and extension into the spine. The exercise involves moving from a rounded back (flexion) to an arched back (extension), mobilizing each vertebra in the thoracic (mid-back) and lumbar (low-back) regions.
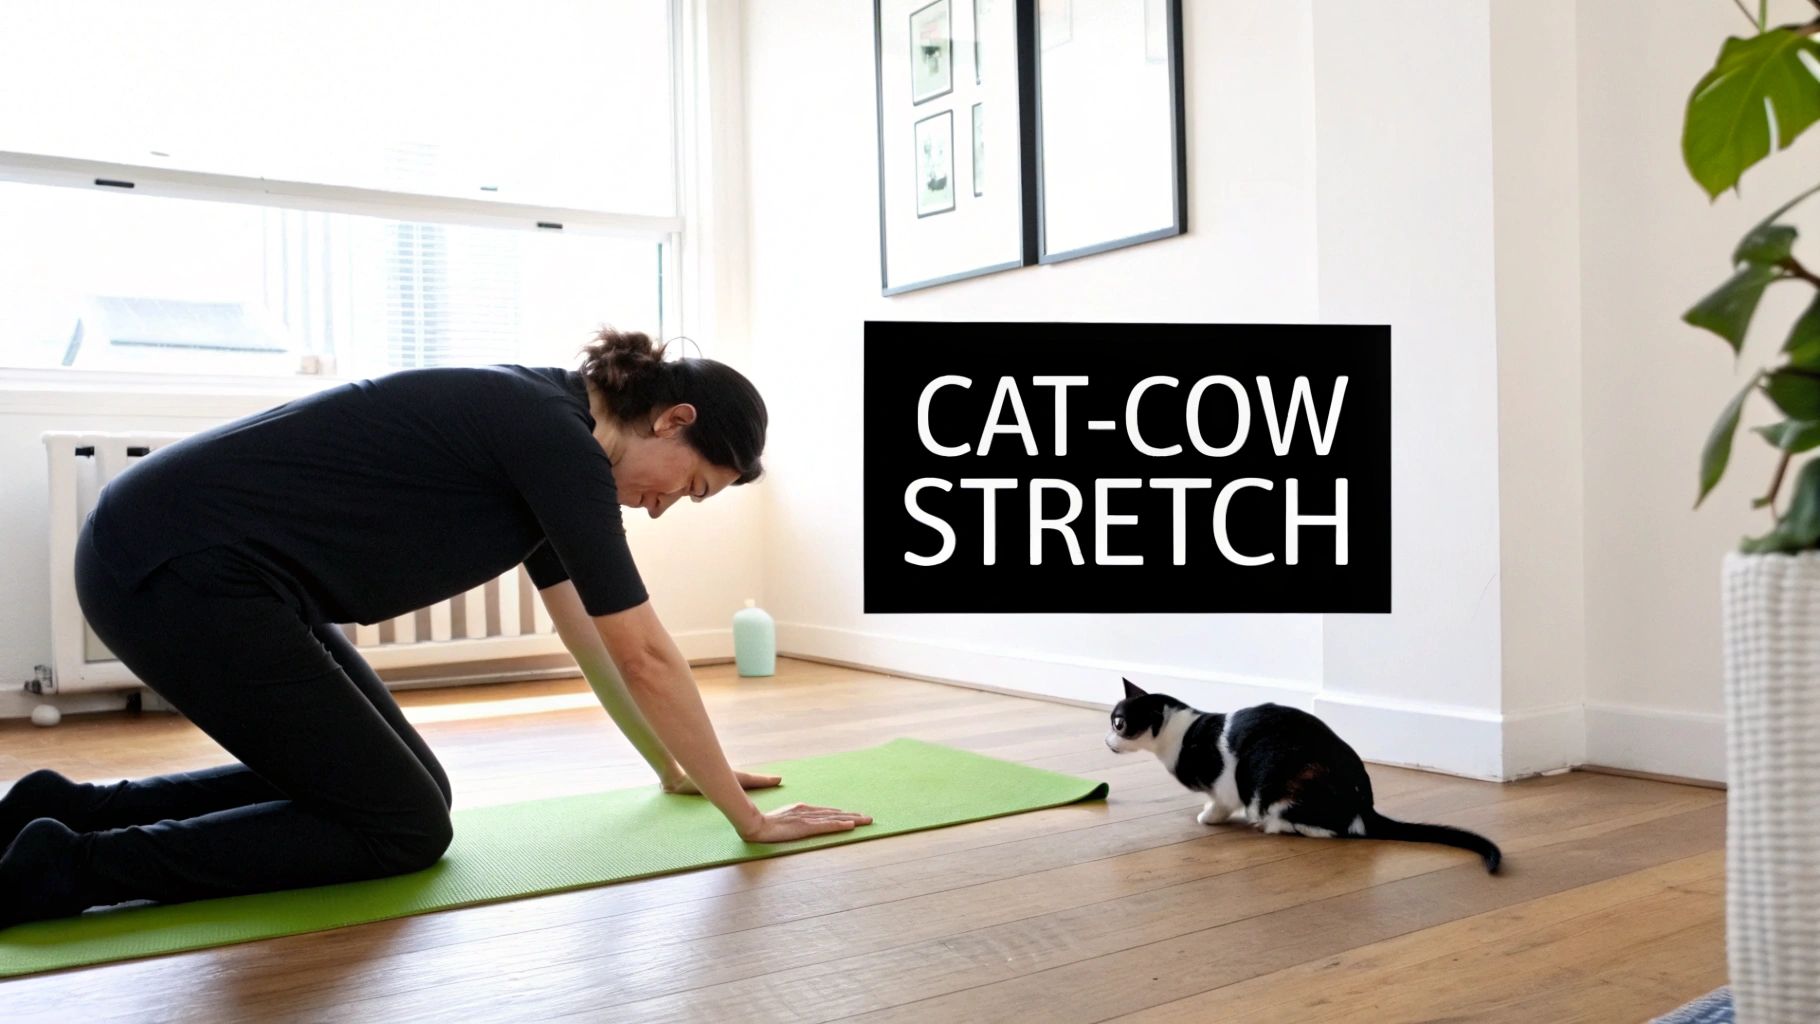
In practice, this is often the first exercise we teach clients to counteract the "desk posture." Spending eight hours hunched over a laptop creates a rigid, flexed thoracic spine. Cat-Cow directly fights this by encouraging spinal extension and teaching you how to differentiate movement between spinal segments—a critical skill for safely executing squats and deadlifts.
How to Perform the Cat-Cow
Follow these steps for perfect form:
- Starting Position: Begin on all fours. Your hands should be directly under your shoulders and your knees directly under your hips. Your back should be flat and your gaze directed toward the floor.
- Cow Pose (Inhale): Inhale and drop your belly toward the mat. Lift your chest and chin, looking slightly forward. Think about pulling your shoulder blades back and down.
- Cat Pose (Exhale): Exhale and round your spine toward the ceiling, tucking your chin to your chest. Actively push the ground away with your hands to spread your shoulder blades apart.
- Flow: Move slowly and deliberately between Cat and Cow, synchronizing your breath with the movement. Aim for 10-15 controlled repetitions.
Coaching Cues and Common Mistakes
Quality trumps speed. Most beginners rush this or only move from their lower back, missing the point entirely.
Key Insight: The goal is to articulate the spine segment by segment, like a wave. This controlled segmentation builds true mobility and body awareness. What we typically see is a client moving their low back and neck, but their mid-back remains locked. This exercise is designed to fix that specific issue.
- Common Mistake: Hyperextending the neck in Cow pose. Keep your neck as a long extension of your spine instead of cranking it back.
- Coaching Tip: Initiate the movement from your pelvis. On the inhale (Cow), tilt your tailbone up first. On the exhale (Cat), tuck your tailbone under first. Let the rest of the spine follow that initial cue.
Programming Cat-Cow
This works for everyone, from the CEO to the competitive athlete. It's a low-risk, high-reward movement.
- As a Warm-Up: Perform 1-2 sets of 10-15 reps before every strength training session. It’s non-negotiable before squat or deadlift days to prepare the spine for load.
- As a "Movement Snack": Use it on rest days or during your workday. If you've been sitting for over an hour, get on the floor and do a set. This is a simple, effective habit we build with our busiest clients.
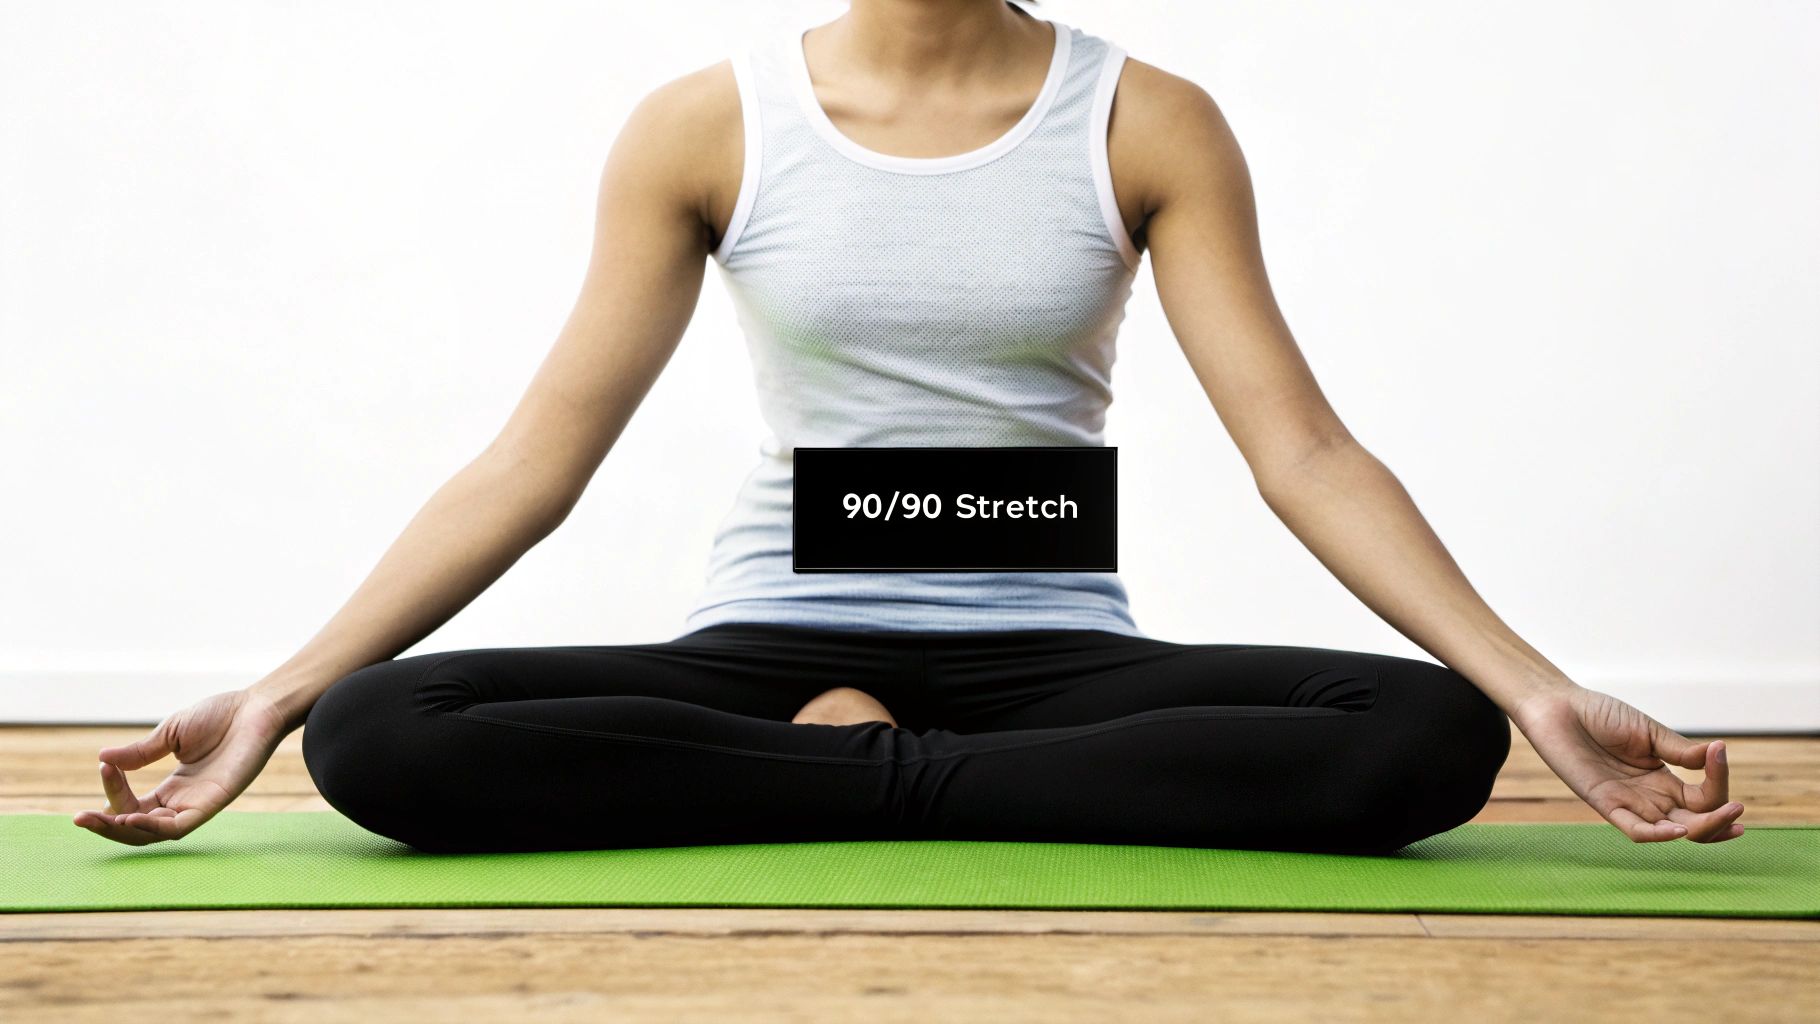
2. 90/90 Hip Stretch (Hip External Rotation)
Tight hips are a universal complaint among our clients, largely due to prolonged sitting. The 90/90 Hip Stretch is a non-negotiable part of our system for fixing this. It's one of the most powerful mobility exercises for beginners because it specifically targets hip external and internal rotation simultaneously—ranges of motion that become severely restricted from a sedentary lifestyle. This position allows you to isolate and improve mobility essential for a deep, pain-free squat.
In practice, we use this stretch to help clients "unlock" their hips. When your hip rotators are tight, your body will compensate during a squat by rounding the lower back or letting the knees cave inward—both increase injury risk. By improving this range of motion with the 90/90, we build the foundation for stronger, safer squats. Better squat depth isn't just about leg strength; it requires adequate hip function, and you can learn how to improve your squat ROM with dedicated mobility work like this.
How to Perform the 90/90 Hip Stretch
Follow these steps for perfect form:
- Starting Position: Sit on the floor. Position your front leg bent at a 90-degree angle, with your shin parallel to your hips. Position your back leg bent at 90 degrees out to the side.
- Establish Posture: Sit up as tall as possible. Most beginners will find their trail-leg hip lifts off the ground; this is expected. Use your hands on the floor behind you for support.
- The Stretch: Keeping your spine long, gently hinge forward from your hips over your front shin. Only go as far as you can while maintaining a flat back. You should feel a deep stretch in the glute of your front leg.
- Hold and Breathe: Hold the stretch for 30-60 seconds, breathing deeply. Do not hold your breath. Switch sides and repeat.
Coaching Cues and Common Mistakes
The goal is a controlled stretch, not forcing yourself into a painful position. Position quality is more important than depth.
Key Insight: The 90/90 position immediately reveals asymmetries between your left and right hips. Pay close attention to which side feels tighter. This feedback is invaluable for individualizing your warm-ups. For most people, one side will be noticeably tighter; this is normal.
- Common Mistake: Rounding the back to lean forward. This shifts the stress from the hip capsule to the lumbar spine, defeating the purpose. Keep your chest up and your back straight.
- Coaching Tip: If you can't sit upright without rounding, place yoga blocks or books under your hands for support. Elevating your torso makes it easier to maintain proper spinal alignment.
Programming the 90/90
This works best for individuals with tight hips from sitting. It does not work for those with acute hip impingement or labral tears, who may need a different approach.
- As a Cool-Down: Perform 1-2 sets per side, holding for 30-60 seconds after a lower-body strength session. Static stretching is most effective when muscles are warm.
- For Active Recovery: Use it on rest days to alleviate hip stiffness. We often assign this as "homework" for our desk-bound clients to do while watching TV.
3. Thoracic Spine Rotation (World's Greatest Stretch Variation)
If Cat-Cow restores front-to-back spinal movement, Thoracic Spine Rotation unlocks its rotational capacity. This is a non-negotiable drill for anyone hunched over a keyboard all day. It specifically targets the thoracic spine (mid-back), a region that becomes notoriously stiff, forcing the neck, shoulders, and lower back to compensate.

In practice, we see a direct link between poor thoracic mobility and shoulder pain or poor overhead press performance. When the mid-back can't extend and rotate, the body gets the arm overhead by arching the lower back or shrugging the shoulder—inefficient, high-risk strategies. This drill is one of the most effective mobility exercises for beginners to directly fix that limitation, building a foundation for safer, stronger pressing and pulling.
How to Perform Thoracic Spine Rotations
Follow these steps to isolate the mid-back:
- Starting Position: Begin in a tabletop position: hands under shoulders, knees under hips. Keep your spine neutral and core engaged.
- Hand Placement: Place your right hand gently behind your head. Do not pull on your neck.
- Rotation (Exhale): Exhale as you rotate your chest and right elbow up toward the ceiling. Your eyes should follow your elbow. The goal is to drive the rotation from your mid-back, not just your arm.
- Return (Inhale): Inhale as you slowly reverse the movement, bringing your right elbow down toward your left elbow.
- Repetitions: Perform 8-12 smooth, controlled rotations on one side before switching.
Coaching Cues and Common Mistakes
The most common mistake is allowing the hips to sway to create fake rotation. The focus must be on isolating the thoracic spine.
Key Insight: True thoracic mobility is about dissociating the upper and lower body. Your hips and lumbar spine must remain stable while your mid-back rotates. This skill is critical for any athletic movement.
- Common Mistake: Shifting your weight and hips to the side as you rotate. Lock your hips in place, directly over your knees.
- Coaching Tip: We cue clients to "lead with your chest" and let the elbow follow. Imagine a logo on your shirt that you're trying to show to the wall beside you. This encourages purer torso rotation.
Programming Thoracic Spine Rotations
This works for anyone without acute shoulder or spinal injuries. It's particularly crucial for overhead athletes and office workers.
- As a Warm-Up: Perform 1-2 sets of 8-12 reps per side before any workout involving pressing or pulling. It’s fantastic for opening up the chest and activating the upper back.
- As a "Spinal Health" Superset: We often pair this with the Cat-Cow. Doing them together addresses both flexion/extension and rotation, forming a key part of our mobility assessments. Learn more in our guide to the Structural Balance Assessment.
4. Couch Stretch (Hip Flexor Mobility)
The Couch Stretch is arguably the single most potent static stretch for targeting the hip flexors and quads. This is an intense but highly effective mobility exercise for beginners and advanced athletes designed to restore hip extension—the ability to fully open your hip.
In practice, we see the consequences of tight hip flexors daily: anterior pelvic tilt, chronic low back pain, and inhibited glute function ("gluteal amnesia"). The Couch Stretch directly counteracts this by lengthening the very muscles that become short and tight from sitting. Unlocking the hips is critical for improving squat depth, lunge mechanics, and reducing stress on the lumbar spine.
How to Perform the Couch Stretch
Approach this stretch carefully; it intensifies quickly.
- Starting Position: Find a wall and place a mat on the floor for your knee. Kneel on the pad and place the top of your back foot flat against the wall, with your shin vertical.
- Step Up: Bring your other foot forward and plant it on the floor, creating a stable lunge position. Your front shin should be vertical.
- Find the Stretch: Keeping your torso upright, squeeze the glute of the back leg and tuck your pelvis under (posterior pelvic tilt). You should immediately feel a deep stretch in the front of your hip and thigh. This is the key step.
- Hold and Breathe: Hold this position, focusing on deep, controlled breaths. Aim for 60-90 seconds per side. If it's too intense, move your front foot further away from the wall.
Coaching Cues and Common Mistakes
The biggest mistake is arching the lower back to fake a deeper position. This negates the entire stretch.
Key Insight: The magic of the Couch Stretch happens when you posteriorly tilt your pelvis. Squeezing your glute and tucking your tailbone under is what isolates the stretch on the hip flexors. Without this pelvic control, you are just stretching your lumbar spine, which is not the goal.
- Common Mistake: Arching the lower back and flaring the ribs. This is a tell-tale sign of compensation for a lack of true hip extension.
- Coaching Tip: Keep your core braced as if you're preparing for a gut punch. This, combined with the glute squeeze, locks your pelvis and lumbar spine into a neutral position, ensuring the stretch targets the right tissues.
Programming the Couch Stretch
This is an advanced stretch. It works best for those with significant hip flexor tightness. It is not for individuals with pre-existing knee pain or injuries on the back leg, as it places high tension on the joint.
- As a Cool-Down: Perform 1-2 sets of 60-90 second holds per side after your strength training when muscles are warm. It’s especially beneficial after lower-body days.
- For Active Recovery: Use it on rest days to undo the effects of a long day of sitting.
5. Dead Bug Exercise (Core Stability & Coordination)
The Dead Bug is one of the most powerful exercises we use to teach foundational core stability. This is not a crunch. It's about learning to keep your spine stable while your limbs move—a critical skill for lifting heavy and preventing injury. It’s a cornerstone among mobility exercises for beginners because it activates the deep core muscles (like the transverse abdominis) without putting stressful compressive force on the spine.
In practice, we introduce the Dead Bug to clients whose lower back arches during exercises like overhead presses or push-ups. It directly trains the body to resist extension, teaching you to maintain a neutral pelvis and braced core. This skill is non-negotiable for transferring force efficiently and safely in more complex movements.
How to Perform the Dead Bug
Follow these steps for perfect form:
- Starting Position: Lie on your back with knees bent at 90 degrees and shins parallel to the floor (tabletop position). Extend your arms straight up toward the ceiling.
- Brace and Press: Gently press your lower back into the floor to eliminate any space. You should feel your deep abs engage. This contact is your primary feedback mechanism.
- Opposite Limb Extension (Exhale): Slowly exhale as you lower your right arm and left leg toward the floor simultaneously. Only go as low as you can without your lower back arching off the floor.
- Return to Start (Inhale): Inhale as you bring your arm and leg back to the starting position with control.
- Alternate Sides: Repeat with your left arm and right leg. Aim for 10-12 total repetitions (5-6 per side).
Coaching Cues and Common Mistakes
The goal is deliberate control, not speed. A slow Dead Bug is infinitely more effective than a fast one.
Key Insight: The Dead Bug is an anti-extension exercise. The primary goal is to keep your torso and pelvis completely immobile while your limbs challenge that stability. The movement of your arms and legs is secondary to the stability of your trunk.
- Common Mistake: Arching the lower back. This is the most frequent error. If you feel your back lifting, you've gone too far. Reduce the range of motion.
- Coaching Tip: Imagine a full glass of water sitting on your stomach. Your goal is to move your limbs without spilling a single drop. This cue helps maintain a rock-solid core.
Programming the Dead Bug
This is a universally beneficial exercise. It works for everyone, especially those with a history of low back pain or a weak core.
- As a Warm-Up: Perform 2-3 sets of 10-12 total reps before any strength training session. It’s vital before squats, deadlifts, and overhead presses.
- For Rehabilitation: For clients managing low back discomfort, we program it as a standalone core exercise. It’s a fantastic tool for building stability safely. For more on this, see our resource on recovering from a low back injury.
6. Glute Bridge Hold & Activation (Hip Extension Stability)
The glute bridge is a non-negotiable activation drill, especially for our clients who sit all day. Prolonged sitting causes "gluteal amnesia"—your glutes forget how to fire properly. The Glute Bridge directly combats this by teaching you how to contract your gluteus maximus, the primary muscle for extending your hips. This is crucial for everything from standing up to squatting heavy weight.
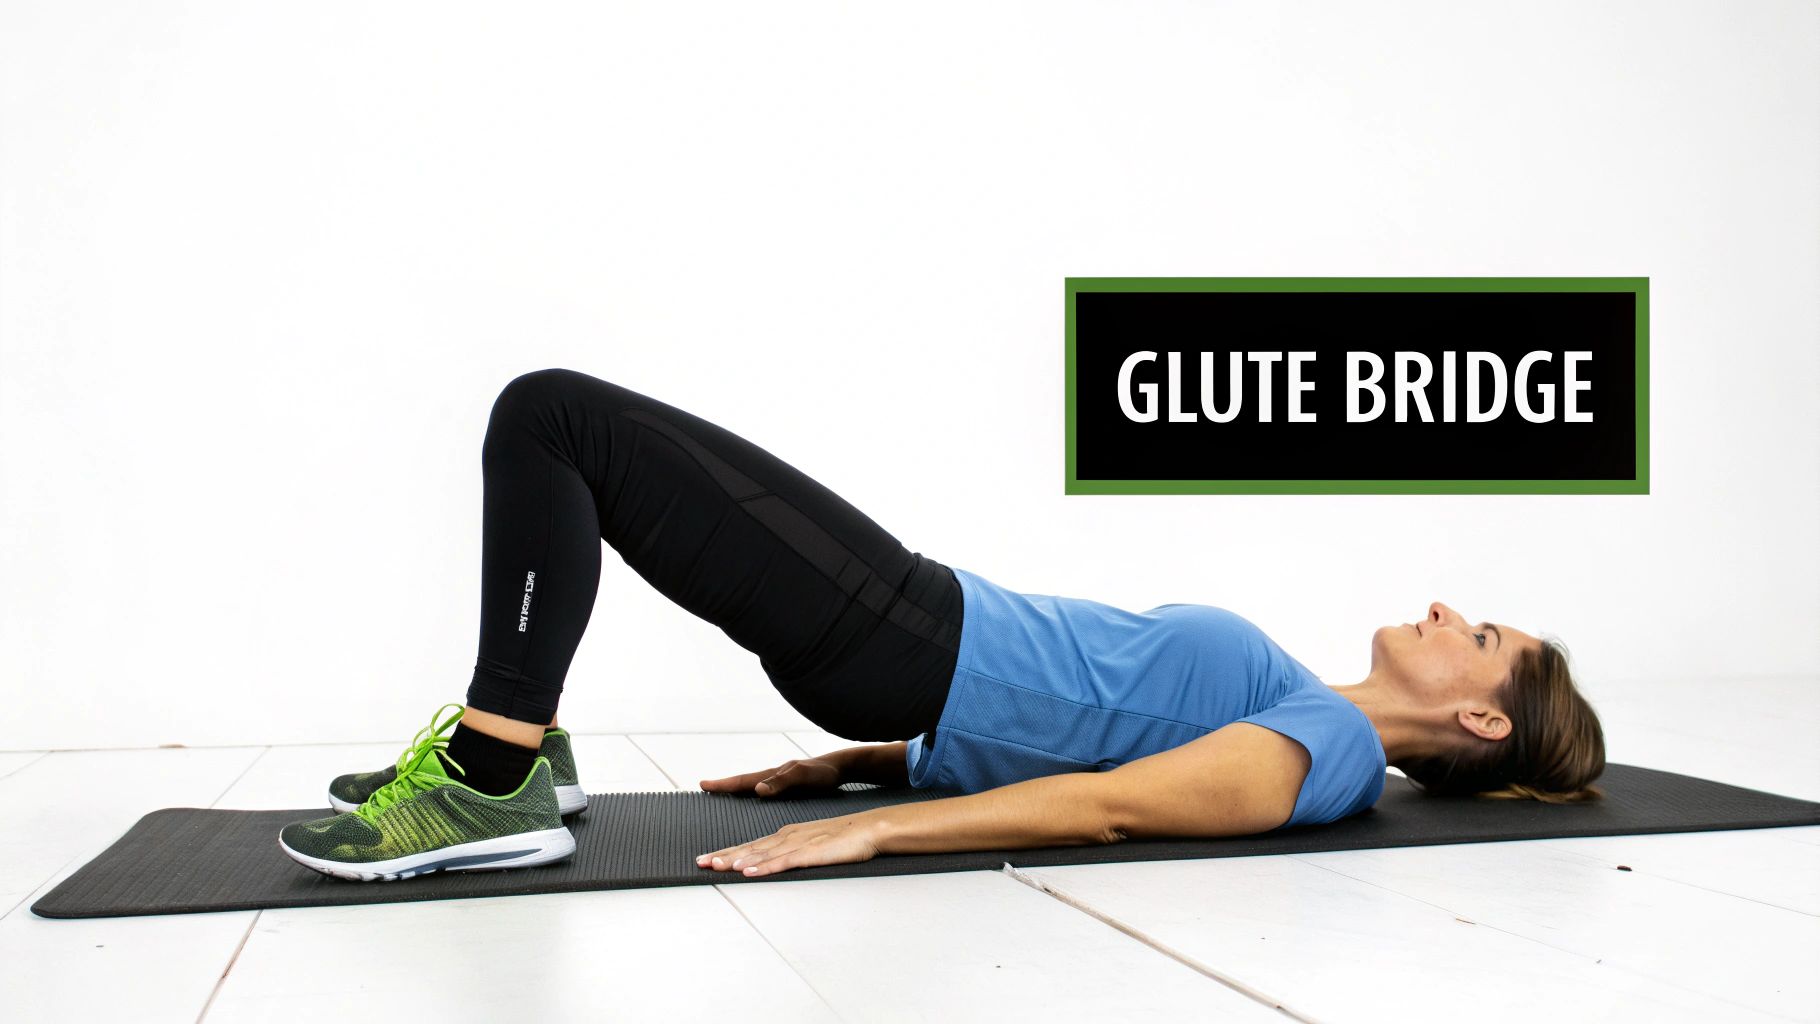
In practice, this is one of the first movements we use to establish a mind-muscle connection. Many beginners initiate hip extension with their lower back or hamstrings—an inefficient and injurious pattern. By focusing on a deliberate contraction, this exercise isolates the glutes, making it one of the most effective mobility exercises for beginners for building a solid posterior chain foundation.
How to Perform the Glute Bridge
Follow these steps for perfect form:
- Starting Position: Lie on your back with knees bent, feet flat on the floor about hip-width apart. Your feet should be close enough that you can graze your heels with your fingertips.
- Drive Up (Exhale): Exhale, press through your heels, and squeeze your glutes to lift your hips. Your body should form a straight line from your shoulders to your knees.
- Hold and Squeeze (Inhale): Hold the top position for a 2-3 second count, maintaining a powerful glute contraction. Keep your core engaged to prevent your back from arching.
- Lower Down (Inhale): Slowly lower your hips back to the start with control. Aim for 10-15 repetitions.
Coaching Cues and Common Mistakes
The goal is glute activation, not just lifting your hips as high as possible.
Key Insight: We often cue clients to "drive your knees forward over your toes" at the top of the bridge. This subtle cue helps achieve full hip extension and maximizes glute contraction, taking the stress off the lower back and hamstrings.
- Common Mistake: Arching the lower back at the top. This means the lumbar erectors are taking over. To fix this, slightly tuck your pelvis (posterior tilt) before you lift and don't push past the point where your glutes are fully contracted.
- Coaching Tip: Drive through your mid-foot and heels. If you feel this in your hamstrings, move your feet slightly closer to your glutes.
Programming the Glute Bridge
This is another universally beneficial exercise, critical for anyone who sits for long periods.
- As a Warm-Up: Perform 2-3 sets of 10-15 reps before any lower-body workout, especially on squat and deadlift days. This "primes" the glutes to fire correctly under load.
- In an Activation Circuit: We often pair it with Dead Bugs and Bird-Dogs to create a comprehensive core and glute activation circuit for new clients. For more advanced glute-building strategies, explore our guide to getting an impressive set of glutes.
7. Child's Pose & Breathing (Parasympathetic Activation & Spinal Mobility)
While most mobility drills are active, Child's Pose is a restorative posture that combines a gentle stretch with a powerful nervous system reset. We don't see it as just a passive stretch; it's an active recovery tool. It’s a crucial part of our mobility exercises for beginners that teaches clients how to downregulate after an intense session and shift into a recovery state.
In practice, we use Child's Pose to teach our clients how to consciously shift from a "fight-or-flight" (sympathetic) state to a "rest-and-digest" (parasympathetic) state. After a heavy set of squats, your nervous system is on high alert. This exercise, combined with diaphragmatic breathing, signals to your body that the workout is over, kick-starting the recovery process immediately.
How to Perform Child's Pose
Follow these steps for perfect form:
- Starting Position: Begin on your hands and knees. Bring your big toes to touch and widen your knees to at least hip-width apart.
- Hinge and Fold: Exhale and sit your hips back toward your heels. Fold your torso forward between your thighs.
- Arm Position: Extend your arms forward with palms down, or rest them alongside your body with palms up.
- Breathe: Rest your forehead on the mat. Close your eyes. Inhale deeply through your nose for 4 seconds, feeling your back and ribs expand. Exhale slowly through your mouth or nose for 6 seconds. Hold for 30-60 seconds or 5-10 deep breaths.
Coaching Cues and Common Mistakes
The value comes from relaxation and breath, not forcing a deep stretch.
Key Insight: Child's Pose is less about muscular stretch and more about nervous system regulation. Focus on "360-degree breathing"—feeling your breath expand not just your chest and belly, but also your sides and back. This is what calms the nervous system.
- Common Mistake: Forcing your hips down to your heels. If your hips are tight, allow them to hover. Do not strain.
- Coaching Tip: Widen your knees to create more space for your torso. Focus on the sensation of your belly pressing against your thighs as you breathe.
Programming Child's Pose
This is suitable for everyone as a recovery tool.
- As a Cool-Down: Perform for 60-90 seconds at the very end of every training session. This is non-negotiable for our clients, as it begins the recovery process before they leave the gym.
- As a Daily Stress Management Tool: We encourage clients to use it for 2-3 minutes during a work break or before bed. It’s an effective way to manage workplace stress, and learning these stress-reduction strategies is key for their overall well-being.
Beginner Mobility Exercises: 7-Point Comparison
| Exercise | 🔄 Implementation Complexity | ⚡ Resource Requirements | 📊 Expected Outcomes | 💡 Ideal Use Cases | ⭐ Key Advantages |
|---|---|---|---|---|---|
| Cat-Cow Stretch (Spinal Mobility) | Low — simple hands-and-knees pattern; needs basic body awareness | None — mat optional; perform anywhere | Improved thoracic/lumbar mobility, reduced stiffness, better posture | Warm-up, desk breaks, morning routine, pre-strength warm-up | Gentle, low injury risk; mobilizes multiple spinal segments |
| 90/90 Hip Stretch (Hip External Rotation) | Low–Moderate — accurate limb positioning required for effect | Minimal — mat/padding; floor space | Increased hip external rotation, improved squat/depth and deadlift mechanics | Pre-squat mobility, cool-down, clients with prolonged sitting | Highly effective for unlocking squat ROM and reducing compensations |
| Thoracic Spine Rotation (World's Greatest Stretch Variation) | Moderate — must rotate from thorax not lumbar; requires shoulder stability | None — mat/clear space; progressions need no special gear | Better thoracic rotation, improved overhead pressing and shoulder mobility | Warm-up for overhead work/rowing; combine with cat-cow for spine prep | Compound mobility gains; immediate improvements to upper-body mechanics |
| Couch Stretch (Hip Flexor Mobility) | Moderate — intense hold; proper alignment essential | Elevated surface (couch/bench), mat recommended | Restored hip extension, reduced anterior pelvic tilt, improved lunge/deadlift form | Post-training cool-down, targeted hip-flexor rehab for desk-bound clients | Very effective for deep psoas/iliopsoas lengthening and posture correction |
| Dead Bug Exercise (Core Stability & Coordination) | Low–Moderate — requires neutral spine and breathing control | None — mat optional; space to lie supine | Improved core stability, motor control, safer loading for lifts | Pre-training activation, rehab, beginners building core control | Safe for low back pain, scalable progressions, enhances lifting mechanics |
| Glute Bridge Hold & Activation (Hip Extension Stability) | Low — simple pattern but needs correct cueing to isolate glutes | None — mat; optional band/weights for progression | Improved glute activation, hip extension, reduced low-back compensation | Pre-lower-body activation, rehab for glute dysfunction, deskers | Rapid activation of posterior chain; low-impact and easily progressed |
| Child's Pose & Breathing (Parasympathetic Activation & Spinal Mobility) | Low — passive posture with breathing emphasis | None — mat optional; any quiet space | Parasympathetic activation, stress reduction, gentle posterior-chain stretch | Cool-downs, recovery between sets, daily stress-management breaks | Restorative and accessible; supports recovery and hormonal balance |
Your Next Step: From Mobility to Mastery
You now have seven foundational mobility exercises for beginners, each chosen for its direct impact on performance and resilience. These are not just random stretches. They are your entry point to building a body that is not only strong but also moves well.
The goal isn't to do a dozen different movements. It's to master this handful of high-impact exercises. In our coaching experience, progress comes from consistency and mastery of fundamentals, not novelty. The difference between an athlete who trains pain-free for a decade and one who is constantly sidelined often comes down to this foundational work.
From Knowledge to Action: Your Four-Week Mobility Plan
Information is useless without application. Here’s a practical, sustainable plan to integrate these movements into your routine. The most common mistake is trying to do everything at once, which leads to feeling overwhelmed and doing nothing.
Here’s our approach for new clients:
- Commit to a Schedule: Dedicate 10-15 minutes before three or four of your weekly workouts to mobility. Put it in your calendar. Treat it like a non-negotiable appointment.
- Structure Your Warm-ups: Stop guessing. Organize your mobility work based on your training for the day.
- Upper Body Days: Prioritize Cat-Cow, Thoracic Spine Rotations, and Dead Bugs. This prepares your spine and core for pressing and pulling.
- Lower Body Days: Focus on the 90/90 Hip Stretch, Couch Stretch, and Glute Bridges. This opens the hips and activates the key muscles for powerful, stable movement.
- Focus on Quality, Not Quantity: The goal is not to rush through reps. For each exercise, focus intently on the feeling. Are you truly rotating your mid-back, or just flailing your arm? Are your glutes firing in the bridge, or is your lower back taking over? This mindful approach is what separates effective mobility work from just going through the motions.
Beyond the Basics: The Long-Term Vision
Mastering these foundational mobility exercises for beginners is phase one. Once you perform them with control, you build a platform for all future strength gains. You'll notice your squats feel deeper, your overhead press feels smoother, and daily movements feel more effortless.
This is where the real value lies. Improved mobility isn't just about gym performance; it's about quality of life. As you become proficient, you can explore new challenges. For those looking to deepen their practice, equipment-based methods can be a fantastic next step. The controlled resistance and core focus of a Pilates Reformer, for instance, can further refine body awareness and stability.
Your commitment to these simple routines will directly translate into bigger lifts, fewer injuries, and a body that works with you, not against you. Start today, stay consistent, and master the basics. That is the most direct path to sustainable results.
Ready to build a strong, mobile, and resilient body with expert guidance? At OBF Gyms, we integrate targeted mobility work directly into your personalised strength training program, ensuring you get results safely and sustainably. Click here to learn more about our coaching programs at OBF Gyms and start your journey today.