

You probably remember the sit and reach test from school gym class. It’s a classic for a reason—it provides a quick, valuable snapshot of the flexibility in your hamstrings and lower back. But this isn't about grades anymore. In our coaching practice, we use it to understand your posterior chain mobility, which is fundamental to how you move and lift every single day.
What the Sit and Reach Test Actually Measures
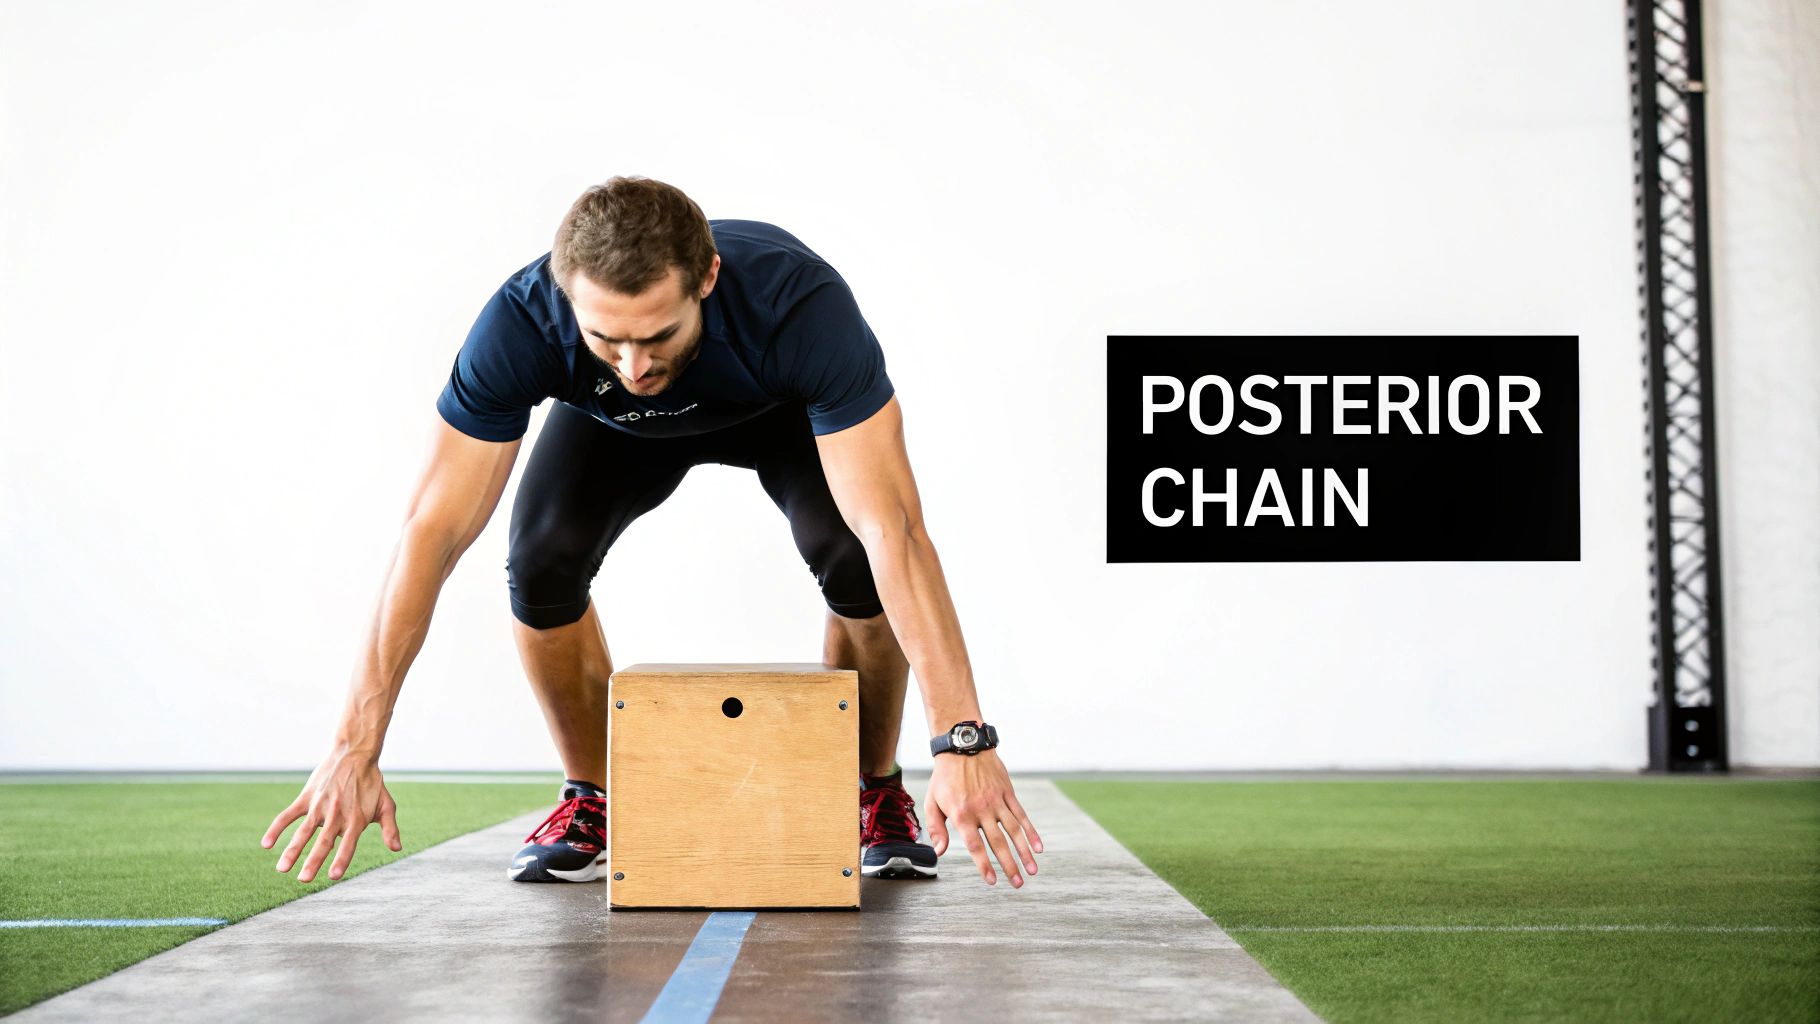
This test is about more than just touching your toes. When we use it with clients, we see it as a key data point on the health of the posterior chain—the entire network of muscles running down the back of your body.
In practice, a low score is often a red flag. We see a clear link between poor hamstring and lower back flexibility and a higher risk of nagging injuries and movement compensations. This isn't just about feeling "tight"; it has real-world consequences.
Why This Single Number Matters
Stiffness in the posterior chain rarely stays isolated. It triggers a domino effect, forcing other parts of your body to compensate, which can lead to a host of issues. What we typically see is that a poor sit and reach score points to underlying risks like:
- Compromised Lifting Form: When you can't hinge properly at the hips, it's nearly impossible to maintain a safe, neutral spine during exercises like deadlifts or squats. This puts your lower back under serious, unnecessary load.
- Chronic Low Back Pain: Tight hamstrings can pull the pelvis into a posterior tilt, putting constant, nagging strain on your lumbar spine. For many clients, this is the root cause of their discomfort.
- Reduced Athletic Performance: Limited hip flexion directly impacts your ability to run powerfully, jump explosively, and change direction efficiently.
- Everyday Discomfort: Simple movements, like bending over to tie your shoes or pick something up, start to feel like a chore instead of being fluid and painless.
A sit and reach score is more than a number; it’s a direct indicator of your body's ability to handle load and move through a full range of motion without compensation.
This test shines when it's used as one piece of a bigger assessment puzzle. It’s not a single, all-encompassing measure of "fitness"—it tells us nothing about your strength, endurance, or upper-body mobility. Instead, we use it to zero in on a specific limitation. That information then helps us build a smarter, more effective training program tailored to you.
To get a better idea of how we build a complete picture of movement quality, check out our other resources on improving your flexibility.
How to Perform the Test with Perfect Form
As coaches, we live by a simple rule: bad data is useless data. If an assessment is performed sloppily, the resulting number is meaningless. To get a reliable score from the sit and reach test, you must execute it with precision.
Think of this as your personal coaching session on paper. We're going to walk you through the exact protocol we use with our clients to ensure the score you get is a true reflection of your flexibility.
The Setup and Execution
Warm-Up First: Never perform this test cold. A quick 5-10 minute warm-up is non-negotiable. Something simple like jogging in place followed by dynamic stretches like leg swings and walking lunges will suffice. This prepares your muscles and provides a much more accurate reading.
Get Into Position: Sit on the floor with your legs straight out in front of you. Remove your shoes and press the soles of your feet flat against the sit and reach box. If you don't have a proper box, a wall works fine. Just lay a measuring tape on the floor between your legs, ensuring the 23 cm mark lines up perfectly with your heels.
Lock in Your Posture: Your knees must remain locked and flat against the floor. This is the most critical rule. The second your knees bend, you're no longer isolating the hamstrings, and the test result is invalid.
The Reach: Stack one hand on top of the other, palms down. Exhale fully as you slowly reach forward along the measuring tape as far as you can. No bouncing or jerky movements—the entire motion must be smooth and controlled.
Hold and Measure: Once you reach your maximum comfortable stretch, you must hold that exact position for 2 full seconds. This is crucial because it prevents you from using momentum to cheat the test. Have a partner note the score at the tip of your fingers, down to the nearest centimetre.
Repeat for Accuracy: Perform the test three times, with a short rest between attempts. Your official score is the best of the three measurements. With most clients, we see their best score on the second or third try as their body adapts to the movement.
Common Mistakes That Invalidate Your Score
Getting this right is all about avoiding common pitfalls. We see the same mistakes time and again with new clients, and they don't just skew your score—they completely defeat the purpose of the assessment.
As a coach, I'd rather see an honest 15 cm score than a cheated 25 cm. The honest number gives us a real starting point to build from; the cheated one tells us nothing.
We’ve put together a quick guide to the most frequent errors we see and how we cue our clients to fix them on the spot.
Common Sit and Reach Test Mistakes and Coaching Fixes
| Common Mistake | Why It Invalidates Your Score | The Coaching Fix |
|---|---|---|
| Bouncing into the stretch | This uses momentum, not flexibility. It gives a false reading and increases injury risk. | "Slow it down. Think about melting into the stretch, don't force it. Smooth and controlled." |
| Bending the knees | Even a slight bend takes tension off the hamstrings, giving you an inflated score. | "Lock those knees. Push the backs of your knees down into the floor. Keep them straight." |
| Not holding the position | A quick touch-and-go doesn't measure sustained flexibility. The hold is mandatory. | "Hold it right there for two full seconds. One… two. Don't rush out of the stretch." |
Focus on eliminating these errors. When you follow this protocol with care, the number you get is a reliable piece of data you can use to track your progress.
And if you're looking for solid ways to improve that score, a great place to start is with these mobility exercises for beginners. They'll help you build a fantastic foundation.
Interpreting Your Sit and Reach Test Score
So, you've done the test, and you've got a number. What now? The first question we always get from new clients is, "Is my score any good?" And the honest answer is: it depends entirely on you.
A score isn't just a number. It's a snapshot that tells a story about your body, daily habits, and training history. It's completely normal for a 22-year-old gymnast to have a different starting point than a 45-year-old who spends their day at a desk. Our goal isn't to have everyone chase some universal "excellent" score; it's about determining what a good, functional score looks like for your body and your goals.
What We Typically See In Practice
For most of the people we work with, a low initial score is nothing to panic about—it’s just our starting line. The real value is in tracking progress. For most clients, moving from the 'Poor' to 'Average' category is a completely realistic goal within 8-12 weeks of consistent, intelligent training.
This isn't about turning you into a contortionist. It's about building enough functional mobility to perform key strength movements—like squats and deadlifts—with solid form. This not only makes you stronger but also dramatically reduces your injury risk and makes daily life feel better. Your sit and reach score is simply one of the tools we use to guide that process.
Understanding Normative Data
While your personal context is king, it can be useful to see how you stack up against the general population. Normative data gives us a rough benchmark. For instance, data from Statistics Canada’s Canadian Health Measures Survey consistently shows that females tend to score higher than males across all age brackets. For adults aged 20-29, the 50th percentile for women was around 30 cm, while for men it was closer to 20 cm. You can dive into the full study to see more of these national health findings on flexibility.
Just be warned: it's easy to get a misleading score if your form is off. This chart shows the two most common mistakes we see that can skew your results.
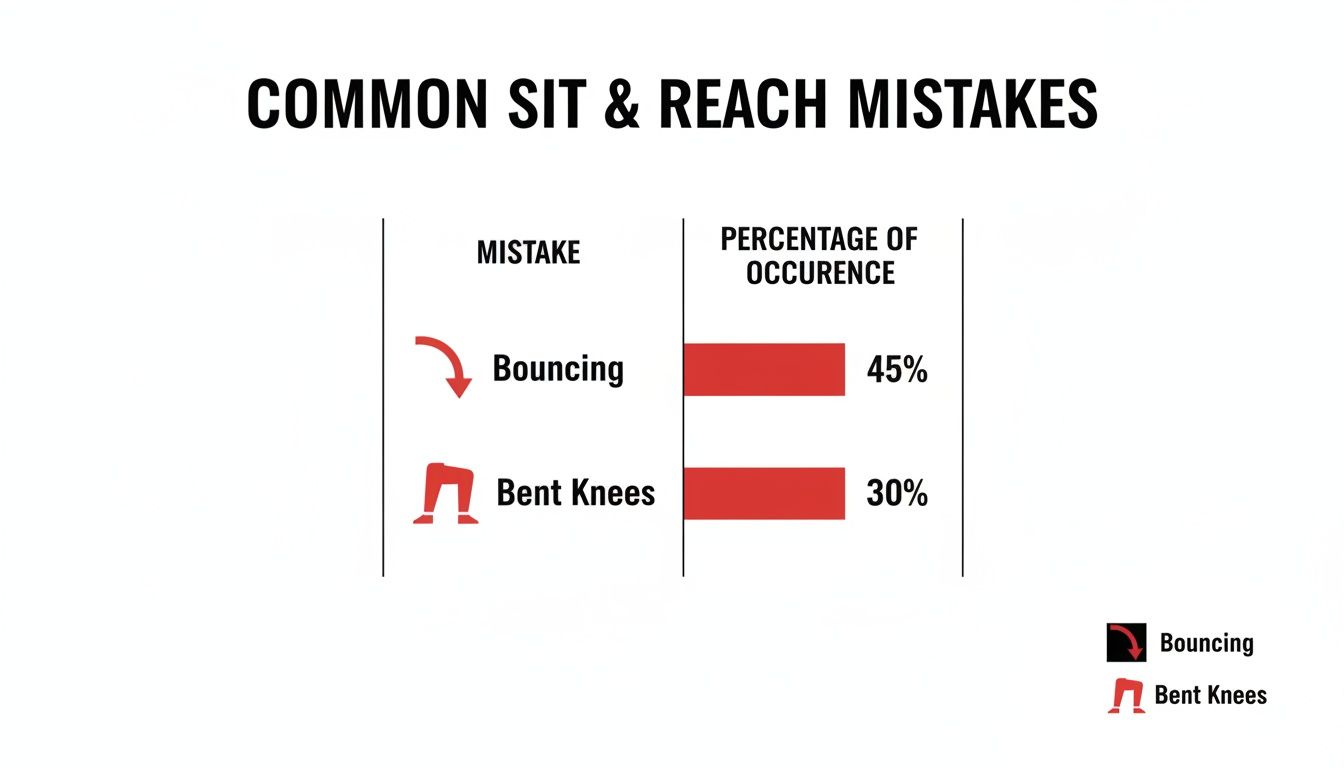
As you can see, bouncing to gain a few extra centimetres or letting your knees bend are extremely common cheats. They might make your score look better, but they give you a false sense of your actual flexibility.
From a coaching perspective, an honest score, even if it feels low, is far more valuable than an inflated one. It gives us an accurate starting point to build a program that actually works. We can’t fix a problem we haven’t properly measured.
Think of a low score as a signal that your posterior chain—the muscles down the back of your body, like your hamstrings and glutes—needs attention. It tells us, as coaches, to program specific mobility drills and strengthening exercises to help you move better and support your long-term fitness goals. If you're struggling to make sense of it all, we can help when you're confused over your results.
Your Takeaway: Don’t get hung up on that first number. See it as your starting line and focus on making small, consistent improvements over the next two to three months. That's where real progress happens.
A Proven Plan to Improve Your Flexibility
A low score on the sit and reach test isn’t a life sentence—it’s a starting line. From a coaching perspective, a poor result gives us a clear target. It’s the data we need to build a smart plan that will not only boost that number but, more importantly, improve how you move every day.
Here's a common mistake: people think the answer is to stretch their hamstrings into oblivion. But that’s rarely the solution. In practice, chronic "tightness" is often a symptom of a deeper issue, like weak glutes or poor core stability. Your hamstrings are simply overworking to compensate, leaving them feeling perpetually tense.
Our approach addresses the root cause by blending targeted mobility work with fundamental strength training. This isn't just about becoming more flexible; it's about building a stronger, more balanced, and resilient body.
Phase 1: Mobilize and Activate (Weeks 1-4)
The first month is all about laying a solid foundation. We focus on teaching your body better movement patterns and activating dormant muscles—specifically your glutes and core.
- Frequency: Perform this routine 3-4 times per week. You can do it on its own or, even better, as part of your warm-up before a strength workout.
- Static Stretching: After your workouts, hold a classic Seated Hamstring Stretch for 3 sets of 30-45 seconds per leg. Breathe into the stretch; never force it.
- Mobility/Activation: Begin your sessions with Cat-Cow Stretches (2 sets of 10 reps) and Glute Bridges (3 sets of 15 reps). This combination is excellent for teaching pelvic control and getting your glutes to fire.
This phase works best for beginners or anyone who has been inactive for a while. It’s gentle, focused, and sets the stage for progress. This strategy is not for advanced lifters who already have a solid mobility routine; they need a more targeted intervention.
Phase 2: Strengthen and Lengthen (Weeks 5-8)
With the groundwork laid, it's time to introduce loaded movements that build strength through a full range of motion. This is where real, lasting change happens. By strengthening your glutes and core, you are teaching your hamstrings that they can finally relax.
The star of this phase is the Romanian Deadlift (RDL). Start light—use dumbbells or even a PVC pipe to master the hip hinge pattern. Concentrate on pushing your hips back while keeping your back flat. You should feel a deep stretch in your hamstrings as you lower the weight.
As coaches, we see the RDL as more than just a hamstring exercise; it's a masterclass in core stability. Done right, it teaches your body to create and maintain a stiff, stable spine under load—a skill that protects your back in almost every other lift.
During this stage, continue your post-workout static stretching and the glute bridges in your warm-up. The RDL becomes the centrepiece of your routine—aim for 3 sets of 8-12 reps, 2-3 times per week.
Phase 3: Integrate and Progress (Weeks 9-12)
In the final month, we increase the intensity and integrate your new mobility into more complex, functional movements. This is about solidifying your gains and making them a permanent part of how you move.
We’ll progress the RDL by gradually adding weight, but only if your form remains perfect. We might also bring in exercises like Goblet Squats to challenge your core stability and hip mobility simultaneously. This is where a holistic training approach really pays off. For more ideas on rounding out your program, you can explore other flexibility training methods.
Declining flexibility is a genuine concern, and not just anecdotally. For those feeling particularly stiff, adding gentle yet effective yoga routines for lower back pain relief can also make a huge difference.
Here's a sample plan that puts all these concepts together, showing how you can steadily improve over a 12-week period.
12-Week Sample Flexibility Improvement Plan
| Phase (Weeks) | Focus | Key Exercises | Frequency |
|---|---|---|---|
| Weeks 1-4 | Foundational Mobility & Activation | Seated Hamstring Stretch, Cat-Cow, Glute Bridges | 3-4x per week |
| Weeks 5-8 | Strength Development & Range of Motion | Light Romanian Deadlifts (RDLs), Glute Bridges, Hamstring Stretch | 2-3x per week |
| Weeks 9-12 | Integration & Progressive Overload | Heavier RDLs, Goblet Squats, dynamic warm-ups | 2-3x per week |
Remember, this is a template. Real progress happens when a plan is adjusted based on your individual needs and feedback.
Your main takeaway should be this: a low sit and reach score isn't just a hamstring problem; it's a system problem. Commit to this balanced 12-week plan of mobilizing, strengthening, and integrating, and you’ll address the root cause to build functional, lasting mobility.
Understanding the Limits of This Test
As evidence-based coaches, we know that no single test tells the whole story. While the sit and reach test is a useful tool in our assessment kit, it has distinct limitations you must understand before putting too much stock in your score.
A common issue we see is how body proportions can completely skew the results. Someone with proportionally long arms and a short torso might score exceptionally well, giving a false impression of amazing hamstring flexibility. Conversely, a person with shorter arms could get a poor score despite having excellent mobility.
It's a Piece of the Puzzle, Not the Whole Picture
This is exactly why we never rely on one metric alone. The sit and reach test is a starting point—a single data point that can flag potential tightness in the posterior chain. But it tells us nothing about hip mobility, ankle dorsiflexion, or thoracic spine rotation, all of which are critical for moving safely and effectively.
In practice, we pair this test with a broader movement screen. We want to see how you perform a bodyweight squat, a lunge, and an overhead reach. These functional movements give us a far more complete picture of how your body moves as an integrated system.
From a coaching perspective, a high sit and reach score is meaningless if a client can't perform a deep squat without their lower back rounding. We're interested in functional mobility that translates to real-world strength and resilience, not just impressive-looking numbers.
The test works best as a simple, repeatable benchmark for tracking hamstring and lower back flexibility over time. It is not a definitive measure of overall athleticism or functional movement capacity. For clients with known disc issues in their lower back, the required forward flexion can be uncomfortable or even contraindicated, so we always have alternative assessments ready.
By combining this test with a full-body movement screen, we get a much clearer understanding of your unique needs. You can learn more about how we build this complete profile by reading about our structural balance assessment.
The Main Takeaway
Treat your sit and reach score as a clue, not a conclusion. It provides valuable information about a specific area, but a truly effective training program is built on a holistic view of your movement, not just a single number from a box.
Your Next Steps Toward Better Mobility
Information is only powerful when you act on it. So, what's the big takeaway from all this? Simple: test, don't guess. Use our protocol to get your true, accurate baseline score from the sit and reach test.
Once you have your number, commit to adding just one mobility drill and one stretch from our action plan into your regular routine. That's it. Aim to do them three times a week for the next four weeks. With the clients we coach, we’ve seen time and again that trying to overhaul everything at once leads to burnout and poor adherence.
Real, sustainable progress is built on small, consistent actions—not drastic, short-lived efforts. If you're looking for more ways to improve your range of motion at home, exploring the resistance band workout benefits can be a great way to add some variety.
Our core coaching philosophy is this: systematic action leads to predictable progress. This approach helps you build a more resilient and functional body without feeling overwhelmed.
Test yourself again in a month. You’ll be able to see the tangible results of your focused, consistent effort. This is how real, lasting change happens.
Frequently Asked Questions About Flexibility
Over the years, our clients have asked us the same handful of questions about flexibility. We’ve answered the most common ones we hear, cutting through the noise with practical, coaching-focused advice.
How Often Should I Re-Test My Flexibility?
In our experience, re-testing the sit and reach with clients every 8 to 12 weeks hits the sweet spot. This timing is deliberate. Testing too often, like every week, won't show meaningful progress and can be discouraging. True physiological adaptations take time.
Conversely, waiting too long means you’re flying blind. An 8 to 12-week window aligns perfectly with a typical training cycle. It gives your body enough time to adapt to the mobility and strength work in your program, allowing us to see real, measurable improvements and make intelligent adjustments for the next phase. This works best for clients following a structured plan; sporadic training won't yield reliable data.
Can I Still Get Flexible After 40?
Absolutely. We see it with our clients all the time. The idea that you’re doomed to a life of stiffness after a certain age is a myth. While it’s true that tissues can lose some elasticity over time, the body’s ability to adapt doesn't just switch off.
With a smart, consistent plan that combines stretching, mobility drills, and strength training through a full range of motion, you can make significant gains at any age. The key difference we notice is that progress might be a bit slower, and recovery becomes far more important. You just can’t get away with the same volume or intensity you did at 20. The end goal, however, remains the same: building functional mobility that supports an active, pain-free life.
Is It Bad if I Cannot Touch My Toes?
No, not being able to touch your toes isn't inherently "bad." It’s just a piece of information. From a coaching perspective, the goal isn't to hit an arbitrary benchmark but to figure out why you can't. Is it genuinely tight hamstrings, poor pelvic control, or simply your unique body proportions?
We reframe this goal completely. Instead of chasing your toes, we focus on developing a level of flexibility that lets you perform key movements—like a deep squat or a proper hip hinge—with excellent form and without pain. For most people, that’s a far more useful and functional objective. That's mobility you can actually use in your life and in the gym.
Ready to stop guessing and start measuring? At OBF Gyms, we use precise assessments like the sit and reach test to build personalized programs that deliver real, measurable results. Learn more about our coaching method and transform your fitness.